안녕하세요 ! (๑•̀ㅂ•́)و✧
오늘은 Spring에서 데이터를 넘기는 방법에 대해 알아보겠습니다.
JSP 기본객체에는 Page, Request, Session, Application이 있는데
이 중 Request를 이용해 요청하고 데이터를 주고받는 방식을 코드로 한번 살펴보겠습니다 !
파일 구성은 아래 그림을 참고해주세요 !
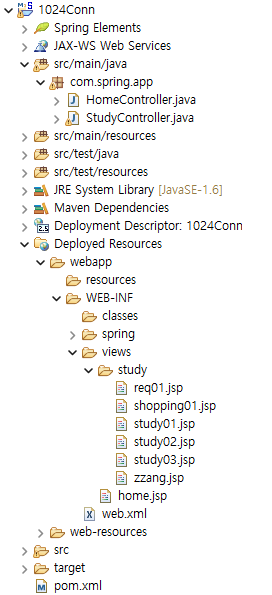
데이터를 요청하고 요청받고 전달하는 작업을 하기 위해 StudyController.java ( Controller ), request01.jsp ( View ) 를 작성해주겠습니다.
( 이번 글에서는 Member 없이 진행해보도록 하겠습니다. )
우선 StudyController.java를 생성해주고 컨트롤러로 사용하기 위해 Annotation을 사용해서 @Controller 를 명시해주겠습니다.
package com.spring.app;

import org.springframework.stereotype.Controller;
import org.springframework.web.bind.annotation.RequestMapping;

@Controller
public class StudyController{

	//	RequestMapping

	@RequestMapping(value="/request01")
	public void request01(HttpServletRequest req) {

		String id = (String) req.getParameter("id");
		System.out.println("id : " + id );
	}
}
@RequestMapping을 써서 /request01 을 요청받았을 때 수행될 작업을 작성해줍니다.
이때 HttpServletRequest 를 써서 request01뒤에 요청받은 id의 값을 가져와서 할당할 수 있습니다.
요청 URL 형식은 /request01?id=1 과 같이 작성해주면,
콘솔에 id : 1 이 찍히게됩니다.
다음 코드는 위에 작성한 코드에 이어서 작성해주시면 됩니다 !
@RequestMapping(value="/request04")
	public String request04(HttpServletRequest req) {
		System.out.println("req : " + req.getParameter("req"));
		return "study/study02";
	}
request04를 요청하면 동작하게되는데, HttpServletRequest를 이용해서 .getParameter로 req에 할당된 값을 가져올 수 있습니다.
이때 return 값으로 /study/study02.jsp 페이지를 보여주게 되는데
다음은 study02.jsp입니다.
<%@ page language="java" contentType="text/html; charset=EUC-KR"
    pageEncoding="EUC-KR"%>
<!DOCTYPE html>
<html>
<head>
<meta charset="EUC-KR">
<title>Insert title here</title>
</head>
<body>
Study02 Page
req : ${req}
</body>
</html>
이때 만약 /request04?req=1 를 요청하면 어떻게 될까요?
콘솔에는 req : 1 이 찍히지만
페이지에는

위처럼 req의 값이 전달되지 않은 것을 알 수 있습니다.
이때, HttpServletRequest로 .setAttribute()로 "req" 에 getParameter로 가져온 값을 할당해서 페이지로 전달해줄 수 있습니다 !
req.setAttribute("req", req.getParameter("req"));
위와 같이 작성해주면,

이렇게 잘 전달된 것을 알 수 있습니다 !
자 이제 다음 코드를 볼까요?
	@RequestMapping("/request05/{id}/{name}")
	public void request05(@PathVariable Long id, @PathVariable(value="name") String nm) {
		System.out.println("id : " + id);
		System.out.println("name : " + nm);
	}
위 코드의 URL 요청 형식은 /request05/1/admin 과 같이 입력해주면 됩니다 !
콘솔에는 id : 1 name : admin 이 찍히겠죠?
페이지에 찍기위해 return 값을 줘볼까요?
	@RequestMapping("/request06/{id}/{name}")
	public String request06(@PathVariable Long id, @PathVariable(value="name") String nm) {
		System.out.println("id : " + id);
		System.out.println("name : " + nm);

		return "study/study03";
	}
이렇게 작성하면 다음과 같이 페이지가 뜨는 걸 확인 할 수 있을겁니다.

이제 @RequestParam을 사용해서 파라미터 값을 받아오도록 하겠습니다.
	@RequestMapping("/request10")
	public String request10(@RequestParam Long id) {
		System.out.println("id : " + id);
		return "study/study03";
	}
/request10?id=10 을 요청했을때 console 창에 id : 10 이 찍히는 걸 알 수 있다.
이때, model에 attribute 로 id 값을 전달해주지 않았기 때문에 아래와 같이 아무것도 안뜨는 것을 알 수 있다.

다음은 required = false 를 이용해서 null을 받았을 때를 방지하고, defaultValue를 사용해서 사용자가 요청한 값이 null일 때 기본값을 넣어주도록 해보겠습니다.
또, addAttribute를 사용해 변수의 값을 전달해주도록 하겠습니다.
	@RequestMapping("/request13")
	public String request13(@RequestParam(required = false, defaultValue="1") int id,
							@RequestParam(required = false, defaultValue="admin") String name, Model model) {
		// 1. int에 대한 해결법, Default 설정하기
		// 2. Integer 사용하기
		System.out.println("id : " + id);
		System.out.println("name : " + name);

		// id에 null값을 넣으면 Error가 뜨며 Attribute에도 전달되지 않는다. 직접 입력한 값만 넣어지는건가?
		model.addAttribute("id", id);
		model.addAttribute("name", name);
		return "study/study03";
	}
작성 완료 후 /request13 을 요청하면 어떻게 될까요?
id와 name에 전달된 값이 없기 때문에, defaultValue에 입력한 값인 1과 admin이 전달되고
따라서 다음과 같이 출력되게 됩니다.

이제 위에 썼던 코드들을 바탕으로 조금 응용해서 apple이라는 초기값이 0인 변수를 만들어두고
+ 버튼을 누르면 1씩 더해지는 것이 보이도록 짜보겠습니다.
제가 짠 jsp 코드는 아래와 같습니다.
shopping.jsp
<%@ page language="java" contentType="text/html; charset=EUC-KR"
    pageEncoding="EUC-KR"%>
<!DOCTYPE html>
<html>
<head>
<meta charset="EUC-KR">
<title>Insert title here</title>
</head>
<body>

<form action="/shopping02/${apple}">
	<input type="text" name="apple" value="${apple}">
	<input type="submit" value="사과+">
</form>

</body>
</html>
이제 사용자가 /shopping 을 요청했을 때 shopping.jsp를 보여주도록 Controller에 작성해주겠습니다.
또한, apple이라는 변수에 초기값인 0을 전달해주도록 하겠습니다.
// Request Mapping < shopping >

@RequestMapping(value = "/shopping" , method=RequestMethod.GET)
public String shopping01(HttpServletRequest req) {
    req.setAttribute("apple", 0);
    req.getAttribute("apple");
    return "study/shopping";
}
이제 jsp에서 + 버튼을 눌렀을 때 /shopping02에 요청되면 apple 변수에 1씩 추가해주는 작업을 해주는 코드를 짜볼까요?
@RequestMapping("/shopping02/{apple}")
public String shopping02(HttpServletRequest req, Model model, @PathVariable(value="apple") int apple) {

    int count = apple;
    count++;
    model.addAttribute("apple", count);
    System.out.println("apple : " + count);
    return "study/shopping01";
}
이렇게 하고 /shopping을 요청하게 되 다음과 같은 화면이 나오게됩니다 !

이제 사과 + 버튼을 눌러볼까요?

눌렀을 때의 apple 값을 전달해주고 요청받을 때마다 1씩 카운팅 을 해주고다시 addAttribute로 업데이트된 값을 전달해주도록 하였습니다.
오늘은 여기까지 스프링에서 데이터를 주고 받는 방법을 알아보았습니다 !
감사합니다 !
다들 환절기 감기 조심하시고 행복한 코딩 생활 하시기 바라겠습니다.
ヾ(@⌒ー⌒@)ノ

'JAVA > Spring' 카테고리의 다른 글
| [ Spring / JAVA ] 스프링 게시판 만들기 (2) (0) | 2024.01.30 |
|---|---|
| [ Spring / JAVA ] 스프링 게시판 만들기 (1) (0) | 2024.01.28 |
| [ Spring / JAVA ] 스프링 - DI 방법 ( 3가지 ) (3) | 2023.10.25 |
| [Spring / JAVA] 스프링 - DI ( Dependency Injection ) 의존성 주입 (2) | 2023.10.24 |
| [Spring / JAVA] 이클립스에서 Spring 설치 및 개발 환경 설정하기 (50) | 2023.10.23 |


